We offer two ways to help you understand how Microsoft Azure Single Sign-On (SSO) works in the TIP Tool™ — pick whichever suits you best:
Prefer to watch?
Start with our short walkthrough video that shows how to enable Microsoft Azure SSO and how users can sign in using their Microsoft account.
Prefer to read?
Scroll down for the full written guide with step-by-step explanations.
What Is Microsoft Azure SSO in the TIP Tool™?
Microsoft Azure Single Sign-On (SSO) allows users to sign in to the TIP Tool™ using their Microsoft work account.
Instead of creating and managing a separate password for the TIP Tool™, users can simply select “Sign in with Microsoft” on the login page and authenticate through their Microsoft account.
Once an organization is linked to a verified email domain in the TIP Tool™, users whose email domains match the organization’s verified domain can sign in with their existing credentials and access the platform securely.
| NOTE: Microsoft Azure SSO is available by request only. If your organisation would like to enable this feature, please contact TIP Tool™ support |
Why This Feature Was Introduced
Many organizations manage employee access through Microsoft Azure Active Directory. This allows companies to control authentication, security policies, and user access from a single identity system.
To support this type of enterprise authentication, the TIP Tool™ now integrates with Microsoft Azure SSO. This allows organizations to enable domain-based authentication for users accessing the TIP Tool™.
By enabling Azure SSO, organizations can:
- Allow users to log in using their existing Microsoft work accounts
- Reduce the need to manage separate passwords
- Maintain domain-level enforcement to ensure users authenticate through Microsoft SSO.
This helps organizations simplify access management while ensuring secure authentication for users accessing the TIP Tool™.
Sign Up Using Microsoft Azure SSO in the TIP Tool™ (Step-by-Step)
To create an organization using Sign in with Microsoft, contact the support team. It is a one-time process, and once the setup is completed, the email domain used during registration is automatically verified and linked to the organization. No additional steps are required.
With your organisation set up in the TIP Tool™, employees can securely sign in using their Microsoft work account, eliminating the need to manage a separate password.
Step 1: Go to the TIP Tool™ login page and select Sign in with Microsoft.
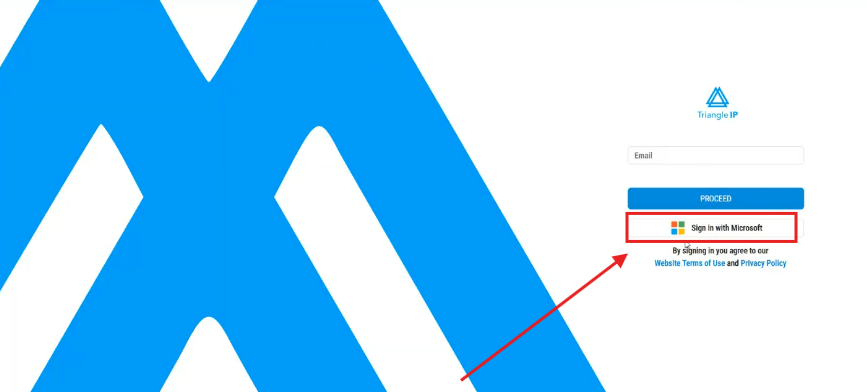
You will be prompted to authenticate using your Microsoft work account.
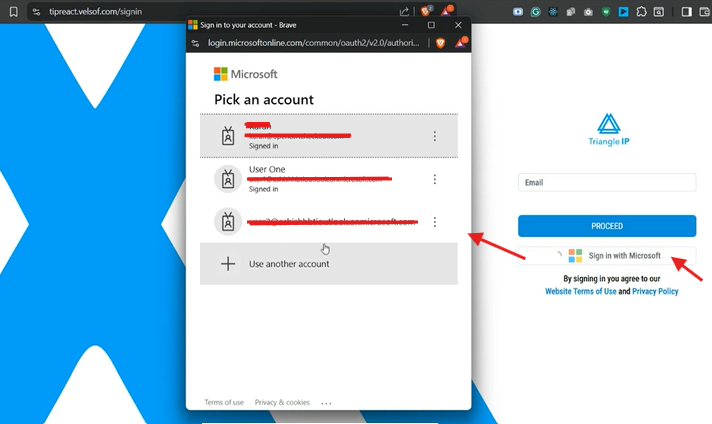
Step 2: Choose the Microsoft account you want to use for authentication.
Microsoft will verify your identity through Azure Single Sign-On (SSO).
Step 3: If your email does not already exist in the TIP Tool™, you will be redirected to the signup page.
On this page:
- Your First Name
- Email Address
- Enterprise Email
may be automatically filled based on your Microsoft account.
These fields cannot be edited during registration, but they can be updated later in the Profile section after the account is created.
Complete the remaining required fields and click Sign Up to create your account.

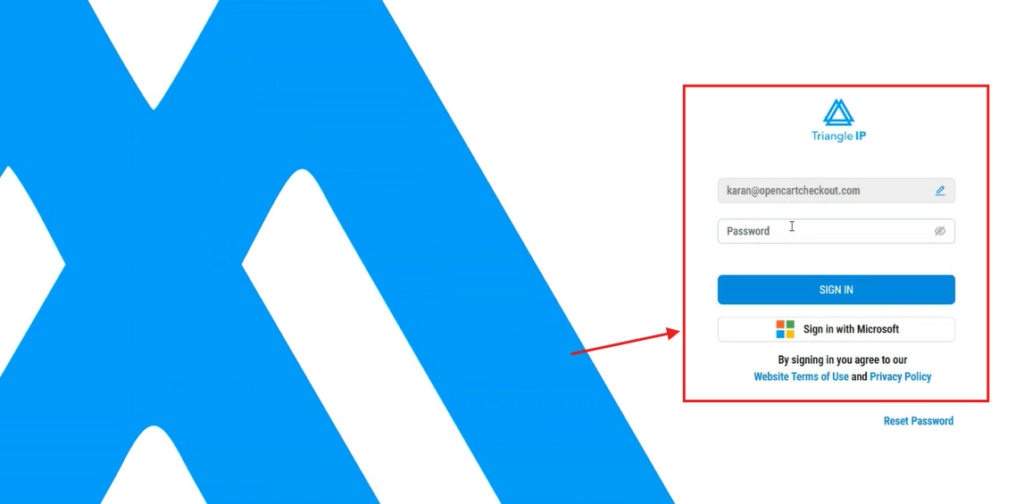
Step 4: After completing registration, you can log in directly using Sign in with Microsoft.
Authentication is handled through Microsoft Azure SSO, so you do not need to set or manage a separate password for the TIP Tool™.
Step 5: After clicking Sign Up, a notification message will appear to verifying your email.
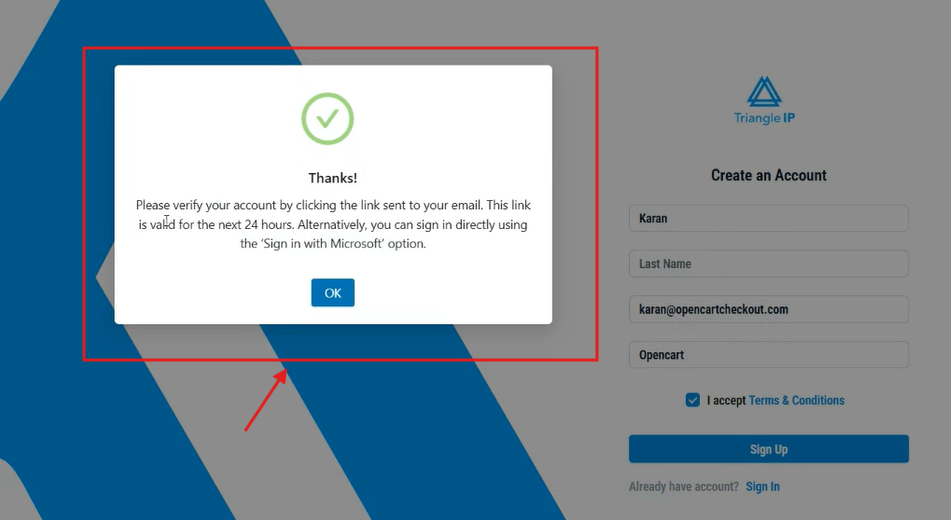
This message indicates that your account registration has been successfully initiated.
Step 6: After verification, return to the TIP Tool™ login page and click Sign in with Microsoft. Select the same Microsoft account you used during registration.
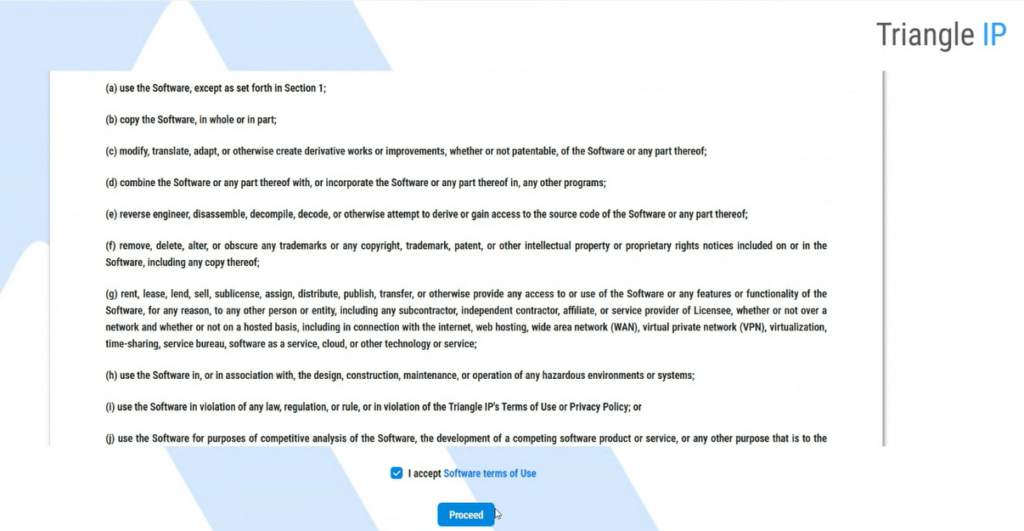
Step 7: Then you will be required to read and accept the Software terms of use. Then click on Proceed.
You will then be logged in and redirected to the TIP Tool™ dashboard.

Organizations that register using Microsoft Azure SSO automatically have their verified domain linked to the TIP Tool™.
This allows organization owners to manage SSO settings for their team. The following section explains how SSO enforcement and user management work for your organization.
Managing Azure SSO for Your Organization
For New Organizations
When an organization is created using Sign in with Microsoft, the email domain used during registration is automatically verified and linked to the organization. No additional setup is required.
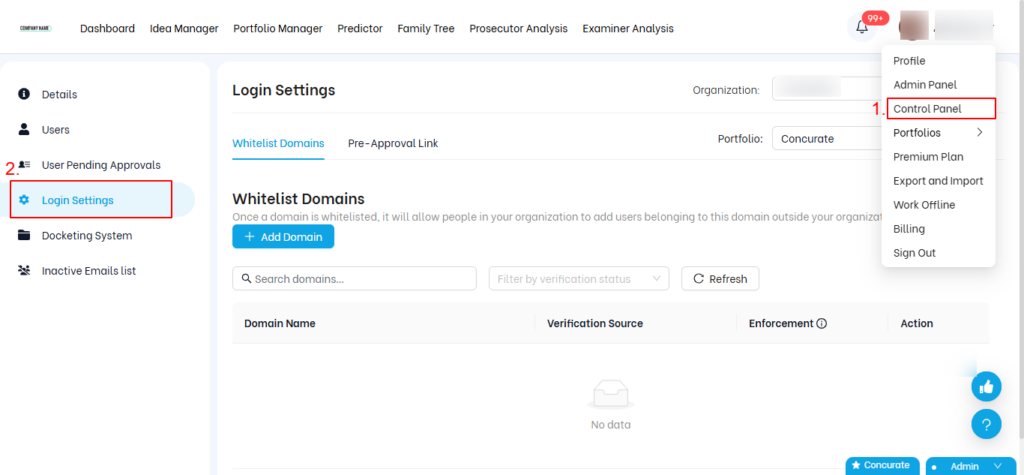
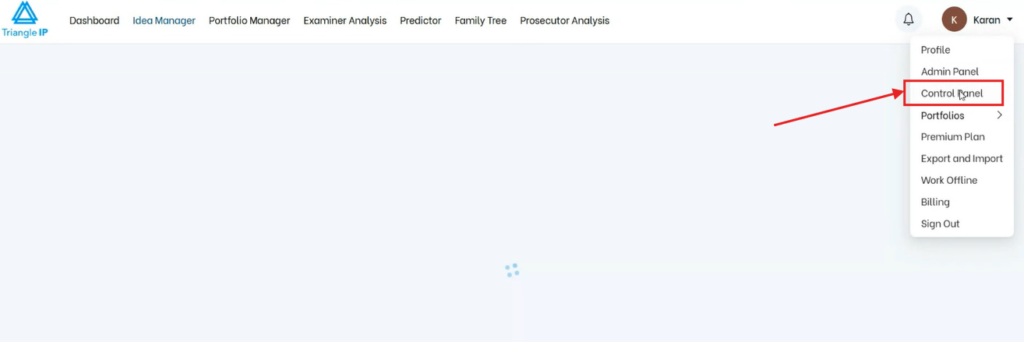
Organization owners can manage SSO enforcement settings from the Control Panel > Login Settings.

You can notice the Microsoft sub-icon in the profile icon, indicating that it is an Azure account.
For Existing Organizations
If your organization was created using the traditional registration method and you wish to enable Microsoft Azure SSO, please contact TIP Tool™ support for assistance with domain mapping.
SSO Enforcement Settings
Once your organization’s domain is linked, the following settings are available in Control Panel > Login Settings:
| NOTE:The TIP Tool™ does not automatically sync users from your Azure Active Directory. When a user from your verified domain signs in for the first time, an approval request is sent to the organization owner. The owner must manually review and approve each user before they are added to the organization and assigned to portfolios. |
Verified Domains:
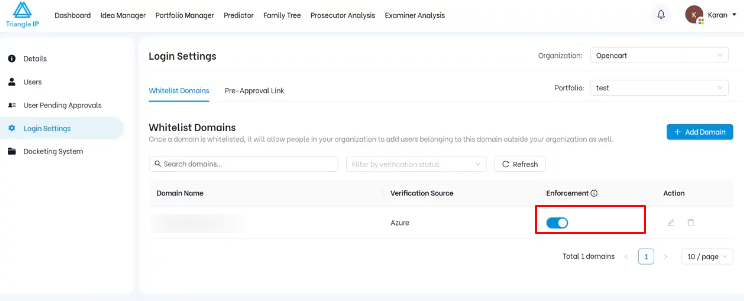
The system displays Azure-verified domains associated with your organization in the Whitelist Domains section. You can enable SSO enforcement for these domains.
Only Azure-verified domains can have enforcement enabled.
You may add additional domains manually, but enforcement is only allowed for domains verified through Azure.
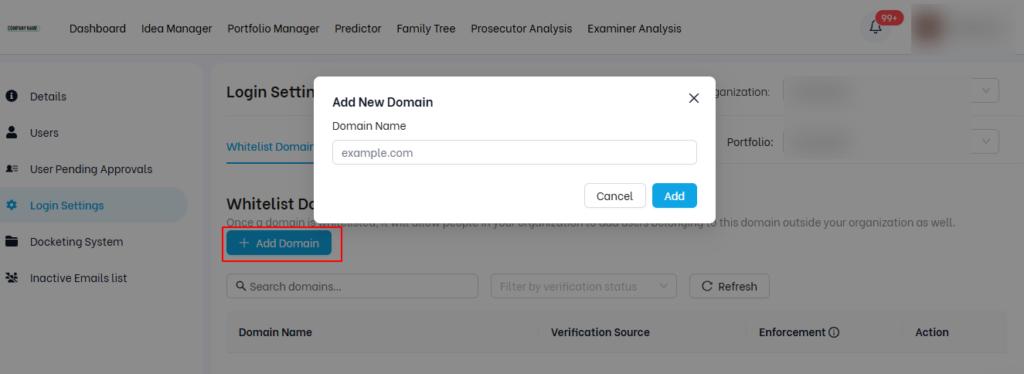
| NOTE: Manually added domains can be edited or deleted; Azure-verified domains cannotbe modified. |
When enforcement is enabled for a domain:
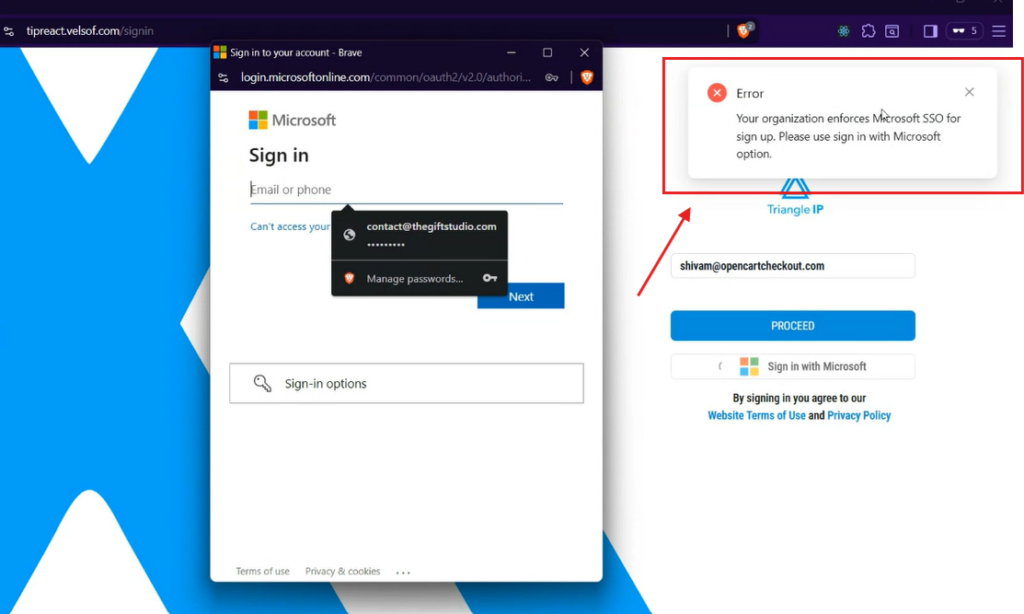
- Users from that domain cannot log in using the traditional email/password method. They will see the message: “Your organization enforces Microsoft SSO for sign-up. Please sign in with Microsoft.”
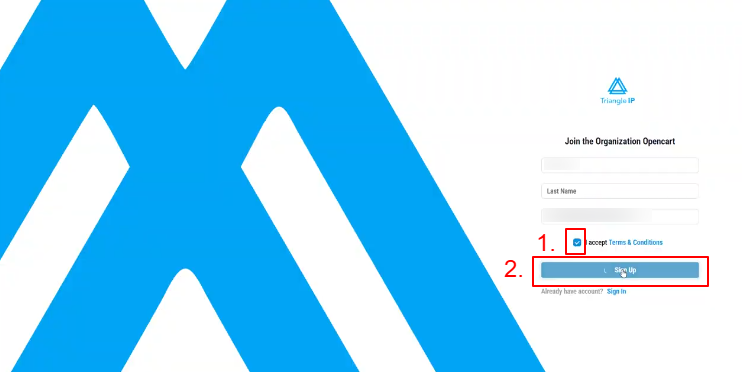
- New users from the enforced domain will be prompted to join the existing organization instead of creating a new one.
- After authenticating with Microsoft, users must accept the Terms & Conditions and complete the sign-up process.
- An approval request is generated and sent to the organization owner.

How Approval Works When a New Microsoft User Tries to Join an Existing Organization in the TIP Tool™
When a user from an enforced Microsoft domain signs in with Microsoft Azure SSO and does not already exist in the TIP Tool™, the system does not create a new organization for that user. Instead, the user is prompted to join the existing organization, and a request is sent to the organization owner for approval.
Follow the steps below to understand how that approval process works.
Step 1: The organization owner must sign in to the TIP Tool™ and open the Control Panel.
Step 2: From the left-hand menu in the Control Panel, click on User Pending Approvals.
Here, you will see two sections:
- Pending Requests
- Assign Portfolio to Azure SSO User
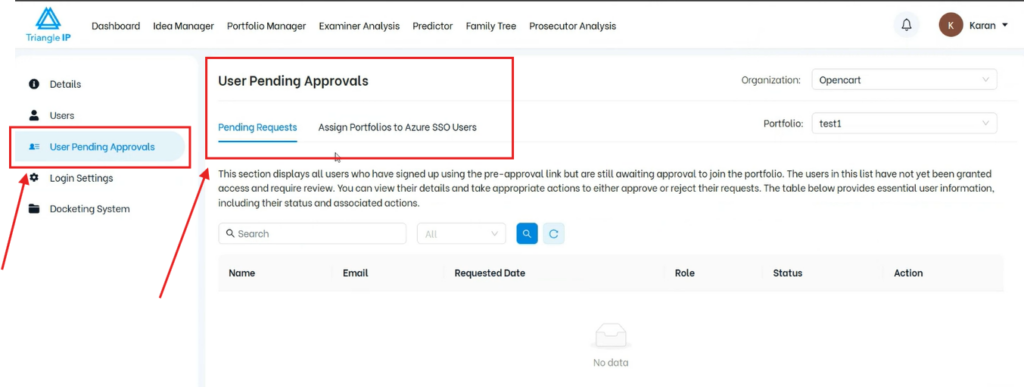
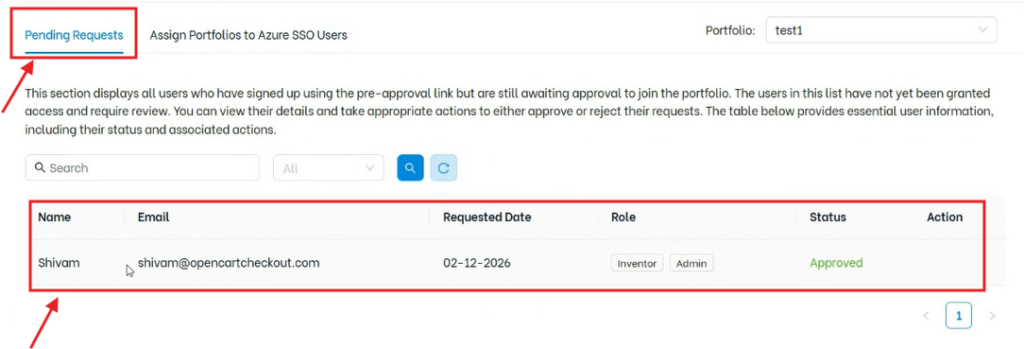
Step 3: Understand the Two Sections
- Pending Requests: This section is used for the existing pre-approval link workflow, where users request access to a specific portfolio.
- Assign Portfolio to Azure SSO User: This section is used for users who sign up using Microsoft Azure SSO and are requesting to join the organization.
The new Microsoft SSO user requests will appear under Assign Portfolio to Azure SSO User.
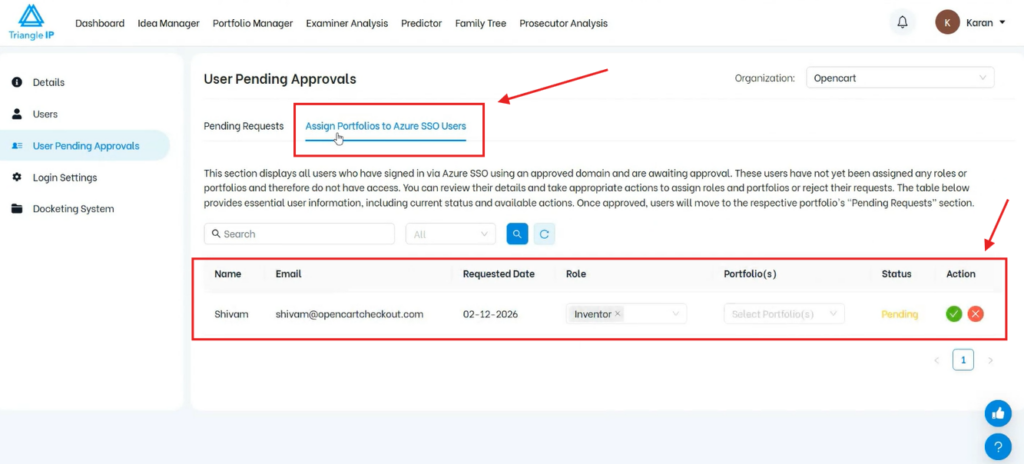
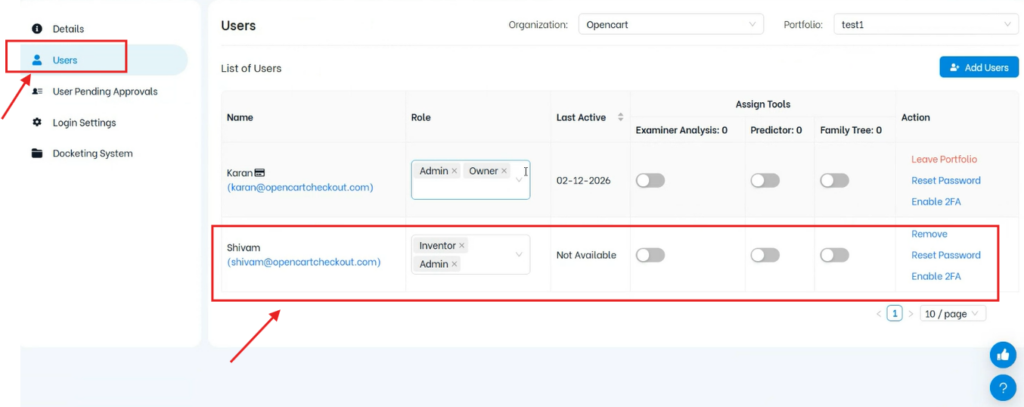
Step 4: The owner can view the details of the user requesting access.
Then the owner must select:
- the portfolio(s) the user should be added to
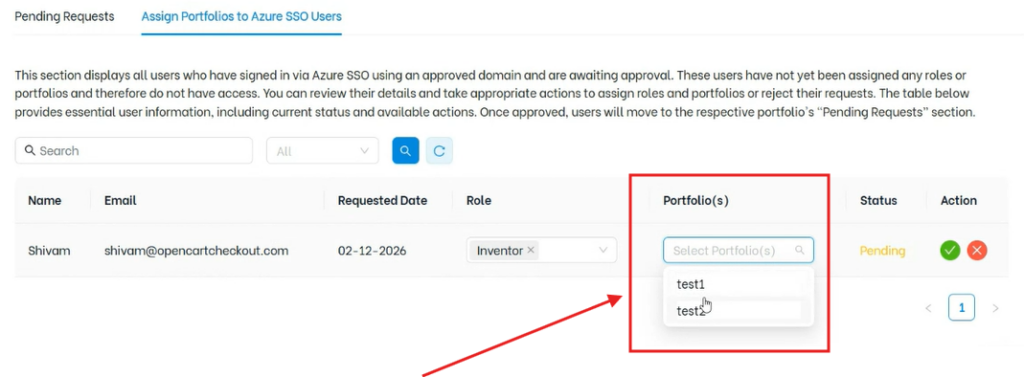
- the role the user should be assigned
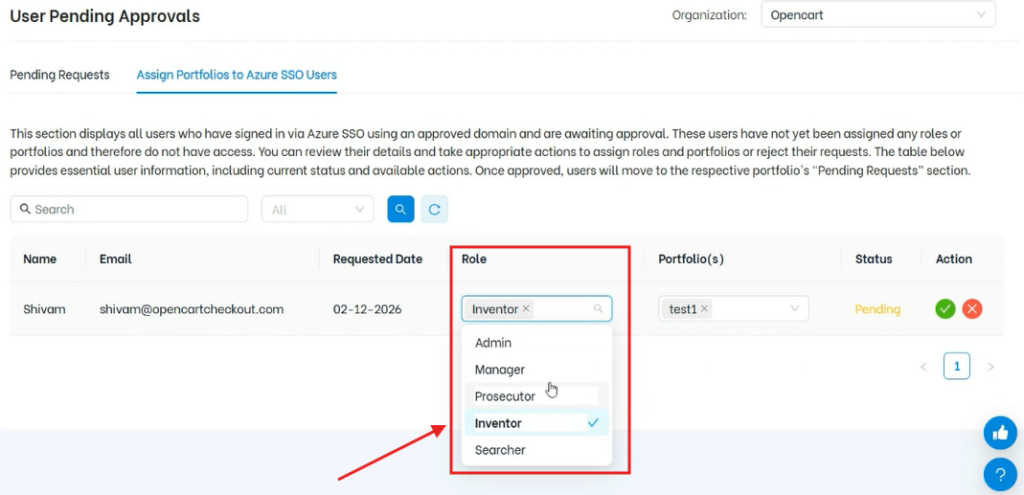
These fields allow the owner to control where the user is added and what level of access they receive.
Step 5: After selecting the portfolio and role, the owner can:
- Approve the request → user is added to the organization
- Reject the request → user is not granted access
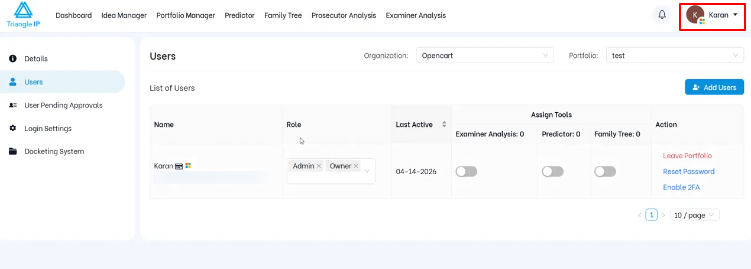
Once approved, you will receive a notification about the approval status.
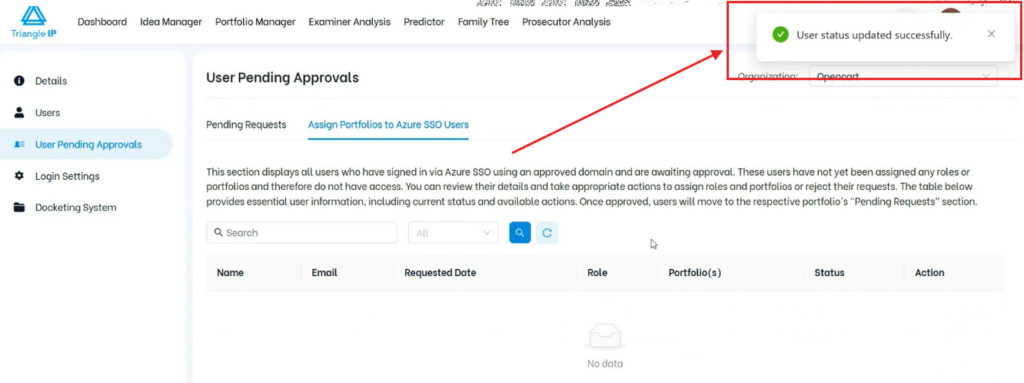
- the user is added to the selected portfolio(s)
- the assigned role is applied
- the user appears in the Users list
A record of the request is stored in Pending Requests for audit purposes.
Quick Recap
- If SSO enforcement is enabled for a domain, users must sign in using Sign in with Microsoft and cannot use the normal login method.
- If SSO enforcement is disabled, users can continue using the standard login flow. New users may create their own account or organization, depending on whether they already exist in the system.